Showing posts with label how to do. Show all posts

Saturday, July 5, 2014

how to post watching football match status on Facebook

How to post watching football match status on Facebook will help you to posting your status on Facebook when you are watching a match between two team and you want to tell your friends about this event. One is to post by simply typing I am watching match between these teams and post your status and other way is with graphic presentation and links, means that if any friends of you want to see this match can watch score card on internet.

Step 1:

Go to the status box and click in it to type something


Step 2:

Click on smiley icon shown below the cursor typing area 


Step 3:

Now select what you are doing , you are watching, reading or any thing else that you are doing but in this case for posting Football match status you should select Watching


Step 4:

After selecting watching as status type the name of teams you are watching For Example Brasil Vs Colombia you will just start typing and you will have option already written


Step 5:

In last step just click on post before posting your can select the opting who can see this status Click on Public button for other options.


Thanks for you time keep watching Fifa Football World Cup 2014...have a nice time on internet.


Tuesday, July 9, 2013

how to create your own theme in window 7

In this post we will learn how to create your own them in window 7 that will change automatically wallpapers with beautiful effects. No more things to read more just follow the tutorial to create your own them in window 7.

Step 1:- Right click on your Desktop and Select Personalize as shown in Picture.


Step 2:- Click on Desktop Background like this picture.

Step 3:- You will move to new window and select Browse button to give path for images.


Step 4:- You will see a dialog box as shown in picture below select the folder where you have saved your wallpapers. 


Step 5:- When you select the targeted folder of Wallpapers new dialog box will automatically select all pictures located in this post. Click on the image shown below to enlarge and see details.


Step 6:- After completing step 5 on next step you will see a them name with unsaved theme. Click on Save theme.


Step 7 :- Next step type the name of your desired theme and press save button. 


This is all you have to do for creating your brand new theme. I hope you will like this post looking for your comments about feedback.


Sunday, May 19, 2013

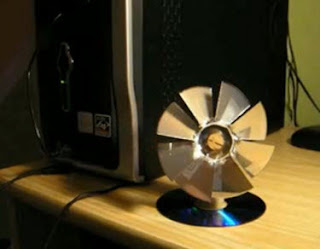
how to make a usb fan with cd


Guys you can make a very useful fan with USB cable and Old CD very easily and it require not a big scientific approach at all. All you have to do is a very simple process given below.

Requirements:-

  • 2 CD disks (Old or new)

  • 1 Small Motor

  • 1 USB Cable

  • Magic for joint


  • 1 big Marker which is dry or wastage or you can buy a new 1

  • 1 cork usually used for test tube cap or any thing like this


Make sure you have all these things mention above in requirement and you know there is not a single item that you cannot afford. So, lets stat making your very first USB Fan or you might thing your self create of this fan.

Process:-

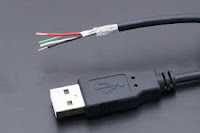
1) Take USB Cable and open its upper cover you will find 4 colors of wire (Red, Black, Green and White) you will need only 2 of them Red and Black wire so simple remove others. 

2) Take Small moter and joint the the USB wire Red at + side and Black at - side

3) Take 1 CD and heat it with candle flame when you feel CD is soft start cutting the disk like fan wings and make 8 to 9 wings 

4) Now take 1 more CD and put the marker in CD middle and joint it with magic or Elfy it will work like stand and then take the Moter and joint it at top of Marker with magic glue or Elfy with help of tape bind. (Wait until all joints are dry and strong)

5) Take upper cap of marker or cork and put it in the middle of CD of step 3 for fan wings and make small hole in cape at back side so that Small moter inserted here. 

6) Finally attach the step 5 CD with stand you created at step 4 wait until all joints are strong and put the CD cable in USB Port enjoy the cool air of USB Fan.


Warning:- This method is test but we are not responsible for any kind of un-wanted result.


Friday, November 9, 2012

how to get image url from Photobucket new intra face

how to get image url from Photobucket  new intra face 
how to get image url from Photobucket  new intra face
Photobucket is world's largest free image hosting service and it is considered as top brand in image hosting services. Having customers from all around the world Photobucket is name of trust among millions of satisfied customers. Photobucket keep changing itself with the passage of time and keep leading the generation with innovative and unique image hosting services. It only require to upload an image which is uploaded only in 2 or 3 seconds and you mouse over the image it will give you all your required links (Direct Image link, HTML code, IMG code and social media sharing links). I found this is the most simplest way to get url of image when you are designing a website or writing a blog because it also help publishers to reduce the load from their website or blog. 

Recently Photobucket has changed its basic template and give a new look to the website and introduce new ways to upload and share images and to get URL. In fact when I open this new template website of Photobucket I was wonder and feel little bit hesitation how to get url of my image but after few step I came to know how to do it because when things are changed from its real shape they require more time to come to normal routine. Here are simple steps to get Direct Image link, HTML code, IMG code and social media sharing links for your images.

1) Click on Upload button like this 

2) You will see new page looks like this.
3) Drag and drop your image file here (new feature in this beta version) or click on Browse button 

4) if you click on Browse button select your image file and upload it or if you want to upload more than one image at same time click on browser to add more image at the end of this  frame. It will looks like this image or only click to Upload button for single image. 

From Library drop down button shown below you can change your album or create new album.


5) After uploading your image click on this view library button 


6) Now move your mouse cursor on image 

7) when you mouse over your image you will see new pop up small box looks like this


8) Click on share media link show above picture you will see new pop up small box looks like this image
9) Click on your required link it will be copied to automatically paste it where you want to use. By default it is on Social networks you can change from tabs to email links and Links is mostly used for website designers. 


Get free software enter your Email

Get quality contents in your inbox free softwares,games, videos and much more :

Delivered by FeedBurner

My Google+ Profile | Link2soft Facebook