Saturday, June 23, 2012

how to receive facebook notificatin on mobile phone

how to receive facebook notificatin on mobile phone


To receive facebook notification on mobile phone is very important in this way you can receive messages and comments on your mobile phone even when you are not online or you can also reply the comments and messages from your mobile phones. To activate your mobile number on facebook just follow these simple steps.
  1. In your facbeook home page click on down arrow symbols at right side top look like the picture given below and than select Account Settings

       2. You will see the page like this picture select mobile from the list left hand on the screen    
           shown in this picture.


       3. You will see mobile phone setting page on new page.
     4. Simply add your mobile phone number here and facebook will send you a message containing on security code put this code into this box and now you have configured your mobile phone number with your face book account whenever a person will send you a message or add comments on your links you will receive a notification on your mobile this service is free but if you reply the message than you will be charged stander charges.
My Google+ Profile


Friday, June 22, 2012

Super Hit songs of bollywood 2012

Top ten super hit songs of Bollywood
Top 20 Bollywood Songs of Year 2012


TOP 10 BOLLYWOOD SONGS of 2011
Top 10 iTem Songs of 2011


My Google+ Profile


Thursday, June 21, 2012

latest Pakistani Songs

Latest Pakistani Songs


Ijazat Pakistani New Song 2012
Soniye Yadaan
kai Yahi Payer hay
Mahiya
Jab say tum gay
Dil jania


Pee Jaun by Farhan Saeed

Patakha larki


My Google+ Profile


Wednesday, June 20, 2012

How to activate camera application on ubl omni agents system


How to activate camera Application on UBL OMNI Agent system?

UBL OMNI is  powerful franchise system and leader of branch less banking in Pakistani market. UBL OMNI is empowering the retailer by giving them rights like banks branches. UBL OMNI at this moment beating all banks in Pakistani market in term of unique kind of services at this moment it is providing all its retailers power to open a Bank Account, Utility Bills Payments, Money Transfer in all over Pakistan, Purchase voucher cards, Pay Witribe bills, Accept KASHAF Foundations instalments, DAMAN instalments, KBL instalments, Omore iccream sales collection, Issuing ATM card of UBL Bank and many other services are still awaiting to be launched. 

Steps to activate Camera on Agent system:

Call UBL Help Line for further details this post has been removed because of Policy violation  


Tuesday, June 19, 2012

Download Text to speak full version software

Text to Speak VoiceMX Studio

I have been looking for best free software to be used for text to speak since many days but I hardly found only trail versions of this kind of software. Today I have got it from market and good new for you is that you are going to get this full version free just follow the instructions given below to activate this as full version.

With the help of this software you can convert your text files such as doc. txt and other simple text formate files into audio formate wav and mp3. This is very useful tools it will also help you to improve your English pronunciation as well.


Click on download button to download free text to speak software

Click on this image to download CD key for full version
serial key for text to speech make full version


My Google+ Profile


Monday, June 18, 2012

Five best free software for audio and video calling on internet


Five best free software for audio and video calling on internet


Internet has changed the way of communication in fast, easy and cheapest way. In Pakistan we hardly find a few examples of communication before 20 or 25 years ago there were very old kind of communication resources like Telephone, letter writing, print media, Radio and television and internet was very rare at that time. The start of new century changes everything, way of communication, life style, business planing, informations resources we can say it has affected every aspect of life.
Today we have very fastest way of communication not only voice calling but video calling has been very popular especially in young generation. People are more likely to talk on video camera rather than simple audio calling. Internet made this all happening around us. Another thing which is keeping the cost control on these softwares is competition between the several companies of market share. In this way companies are offering all these thing for free to enjoy that's why we are getting all these stuff fro free.

In this post I have written a report of best application for video and audio calling report resutls generated from a survey. For this purpose I have selected top rated applications used for video and voice calling including Skype, MNS, Yahoo, Google talk and VSee all these applications are free to personal use.
  1. Skype: Skype is the best free video calling software it delivers hight definition videos it allow you to enjoy group call, Class room session and screen sharing ability. You can use Skype on Your computer, iphone, mobile phone and on new generations TVs. It offer basic and full version for home user and for personal user absolutely free.
  2. MSN:
  3. Google Talk:
  4. Yahoo chat:
  5. Vsee:


Friday, June 15, 2012

How to change the cursor shape in windows XP?

You can change the old style mouse cursor from your screen according to your own choice there are lot of cursors available in windows XP. To change your cursor from arrow sign to other interactive designs follow these steps.

Click on start Menu è Open Control Panel è Click on Printers and other hardware è click on Mouse icon è click on Pointer tab from mouse properties è click on Browse button at bottom è select the pointer style è click on open è click on apply button è Press OK

You will see your selected mouse shape has been applied on mouse shape. I hope you have got this point easily.

If you have tutorial like this or you can create and write your own training material contact me for publishing for all those people who want to learn computer


My Google+ Profile


Wednesday, June 13, 2012

How to use control Panel in windows 7 Part 4


How to use control Panel in windows 7
Part 4

After brief over view and step by step guide line of System and Security we are on Network and Interne

t
options in Control Panel of Windows 7. My last tuto

If you are new to this tutorials click here to get started from first level so you can better understand the Control Panel of Windows 7.
rial on Internet Options in which I have tried to describe all features and options under the tab of General now we will move to next tab in Internet Option which is Security the most important part of this tutorial in order to keep your system safe and faster.

Today’s tutorial Part 4 is on Security tab second tab in Internet Options follow these steps to open this.

Start Menu è Control Panel è Network and Internet è Internet Options

For your convenience real picture has bee published below

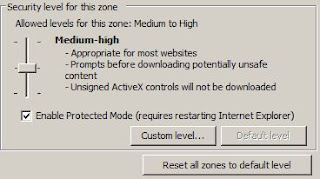
When you click on this tab you face a new dialog box similar to this picture


In this dialog box you can see three kinds of information and setting for these options.
  1. First, Select and zone to view or change Security setting (Internet, Local Intranet, Trusted Sites and Restricted Sites)
  2. Internet ( the zone is for internet expect those websites listed in trusted and restricted sites)
  3. Security Level for this Zone ( High, Medium high and Medium)
First, Selecting zone for security setting:


Here we will discuss all these four options one by one so select Internet icon from this dialog box by selecting this zone you can change your security setting according to your wish if you thought a threat about virus, hacking and other fears you can use High setting or Medium High which is recommended setting you can change this setting by using scale given below to this dialog box just like this picture

Select the security level of your desire and apply the set
ting and then click on OK button or if you changed the setting and do not understand how to retain previous setting click on Reset all Zones to Default Level it will restore all original settings once again. You can also use Custom Level settings but this is for experts only who knows about the effects of Direct X and java scripts.


Local Intranet:

The next option under security tab is Local Intranet this is zone for websites available for you on your intranet. An intranet is a private network, usually within a company or organization. To get m
ore about intranet follow these steps to open windows help.

Start Menu è Control Panel è Network and Internet è Internet Options è click on security tab è Click on Local Intranet icon è Click on Sites Button è click on link what are intranet settings


My Google+ Profile


Tuesday, June 12, 2012

How to use control Panel in windows 7? Part 3


How to use control Panel in windows 7? 
Part 3

Start Menu => Control Panel => Network and Internet => Internet Option
internet options

This post is part of complete learning tutorials for new users of Windows 7 in which we are talking about the Control Panel of Windows 7. Earlier we discussed about System & Security and Network & Internet in Part 1 and Part 2 respectively. This post is actually related with Part 2 of these tutorials in which we discussed about Network & Internetin last part of this tutorial we just show you how to open the Internet Option but today we will discuss all these internet options one by one.

To understand Internet Options is very important for all users especially when they are spending most of their time on internet browsing. To open Internet Option follows these steps Start Menu => Control Panel => Network and Internet => Internet Option. There are 7 tabs in this dialog box when you open Internet Option.
Tabs of internet options

1.      General
2.      Security
3.      Privacy
4.      Content
5.      Connections
6.      Programs
7.      Advance

1.    General: In this tab you can see very basic and much necessary options about the internet. Simply you can change your home page address, Delete history of internet browsing, Change search defaults and change the view of tabs how you want to see them in explorer finally at the bottom of this box you will see Appearance settings like Colors, Languages, fonts and accessibility buttons are there.

·       Home Page: 
     You will see the icon of Home and a text box in front of this icon write your desired home page URL and click on Apply button at the bottom to apply this home page (a page that opens when you click on internet browser icon) it should be written in this format http://www.link2soft.blogspot.com under this text field you can see three more options Use Current ( the current page that is opened in your browser at this time will be added as your home page) Use Default (the page that browser use as its default web page to start internet normally in Internet Browser it is http://go.microsoft.com/fwlink/?LinkId=69157 , in Google Chrome www.google.com and in Mozilla Firefox www.google.com is default home pages) and the third options is Use Blank (if you feels that on start your browser start very slowly because of loading home page you can use this option it will simply open the internet browser without loading any page)
·       Browsing History: 
Using this setting you can permanatly delete the history of your internet browser if you do not want to show this any one you can delete password and other web information like auto forms data etc.. You can use cheek box to automatically delete browsing history on exit of internet browser in this way after browsing internet when you will close the browser it will remove all your history. 
Delete Button: when you click on delete button a new dialog box will be opened in front of you here you can see more specific options to delete the data of your internet browser. It will look like this picture. 
Read carefully all these options before deleting your browsers history if you want to save the data of your favorite websites you can save by cheeking the box button at top and all other options having cheek button if you want to delete you can delete or if you want to save you can save its very customized and easy to use after selecting of your desired options click on the delete button at bottom.
Setting Button: The second option in delete box is setting when you click on this you will see the new dialog box like this picture.
Actually internet browsers store web pages and images of all those pages that you visit continually in order to open a page more faster for you. So here you can change this option if you want to allow browser to save these pages or not. Check for newer versions of stored pages require you to select any of four options including Every time I visit the webpage, Every time I start internet explorer, Automatically and Never below this you can see at box of Disk space Value which is used to save web pages data (8-1024MB, 50-250MB which is recommended) and below this you will see the location of these files on hard disk (c:\users\ computer name\AppData\Microsoft\Windows\Temporary Internet Files\) here you can see your files 3 more buttons are there Move Folder (to change the folder), View Objects(to see specific objectsand View files (to see the files and data stored by internet explorer). In the end you will see History a little box at bottom of this dialog box here you can specify how many days internet explorer should save the list of website you have visited. You can change the value by using value box in which write your command manually or use up and down button to increase or decrease the values after changing settings of your desire click on OK button or if you do not understand some setting click on Cancel button it will remove changes.

·       Change search defaults:

·       Tabs:

·       Appearance:

2.    Security:
3.    Privacy:
4.    Content:
5.    Connections:
6.    Programs:
7.    Advance:
All other parts will be published very soon Thank you for visiting


My Google+ Profile


Monday, June 11, 2012

Anti Avira best free Antivirus for home users

The following post is part of series about best free antivirus software published for you at Link2soft. Before this post two anti virus software has been published at Link2soft including Avast Anti Virus and AVG best free anti virus free of 2012. Today I have selected to talk about the company of 100 million customers from all around the world and having more than 500 employees working day and night to make your computer more secure and safe from virus attacks. Yes it is one and only Anti Avira another best free anti virus software for home users. Anti Avira is very efficient and quicker software and unique kind of anti virus software. Anti Avira awarded best internet security software of 2012 and many other rewards of quality and best services. To see the complete list of Anti Avira Awards click here 

anti avira
download free Anti Avira


My Google+ Profile


Thursday, June 7, 2012

download best free antivirus software of 2012


AVG is called best free Anti Virus software of 2012. AVG start working from 1991 since this they on front line in innovation and improvisation in antivirus software committed to provide full proof security to the customers for all kinds of customer. Including Home customers, Mobile users and Business purposes where Home users are provided best free service to protect their systems from viruses attacks. 
Other services includes AVG Mobilation and  AVG PC tune up first one is form mobile phone devices in which they are also providing a software to block spam sms on mobile phone and second one is for increasing the speed of your computer by cleaning the start up and removing unwanted applications from your pc.
Click here to get it free from the official website of AVG.


My Google+ Profile


Wednesday, June 6, 2012

How to use Control Panel in windows 7? Part 2


How to use Control Panel in windows 7?
Part 2
Early we have discussed How to use Control Panel in windows 7? Part 1 In details in which we talk about the System and Security today we will discuss about the next option Network and Internet .
So, Click on start menu => Open Control Panel => Select Network and Internet to start our new lesson on control panel.


Network and Internet
1.     Network and sharing center
2.     Home group
3.     Internet options

When you open Network and Internet first option is Network and Sharing Center  here you can view a full map of your computer network showing how you are connected with internet or network. You will see basic kind of information and can set up new connections by using this option. When you see a red color cross between computer and internet icon that means you are not connected with the internet or network. If your network or internet wire is not plugged in it will show the same error, if your internet modem is not turn ON will show same error but if internet wire and modem both are active and you are watching Red Cross that means there is problem with your internet connection.

To resolve this issue click on the red circle and follow the troubleshoot options to resolve this problem automatically. You will see also a link you are not connected to any network Connect t a network by clicking here you will be connected with the networks available for you.

Below these options you will see more links including

    • Set up New connection or network (here you can create new connection if your are going to connect you computer for the first time you will need this option. You can add a wireless connection, broadband connection, dial up, HOC  and VPN, router and access point. Best way is to call your local network operator and get guide lines for setting up new connection.
    • Connect to a network (this is similar to the upper options but its more specific and directly connections with network and internet connections.
    • Choose homegroup and Sharing ( here you can add printers, scanners and any other devices like that using your network these kinds of options are mostly used in offices and organizations where a single printer receiving commands from all computers or you  can change sharing settings form here.
    • Troubleshoot problems ( if you are unable to understand any error or having problem with internet or network you can use windows troubleshoot problems it will automatically resolve the problems

2.     Home group:

   In this option you can share your data or anything you want share picture and videos with those people who are using windows 7 in your own home. It requires your computer network connection must be at home. Following with three more options Tell me more about home groups, change advance setting and use troubleshoot.
3.     Internet options: 

   This is the last option which is very important topic for all those user who spend most of their time while surfing on internet. You can change your Homepage( page that opens when you click on internet browser) Manage browsers add-ons ( these are little extensions and tools attached with your internet browser like tool bars etc) you can delete all these add-ons from here if you do not want any one from these add-ons some of these really disturb us while using internet and these are automatically installed on our computer with any software especially when you download a software from internet these add-ons are attached with these software. So, here is solution for these problems go to this page and remove all unwanted add-ons. Delete browser history and cookies the next options will help you to delete your computer history and other temporary files if you do not like some one to see your browser history.
 Now we will discuss all these options one by one in internet options dialog box. 


Monday, June 4, 2012

windows 8 new wallpapers

Microsoft's operating systems are very famous all around the world mostly Microsoft windows is used in all computer devices. That's why likeness is being increasing day by day people love to use Microsoft windows Logo and also like to use windows wallpaper on their desktops. Whenever new windows version launched people start searching for wallpapers of it. Today I have designed brand new windows 8 wallpapers for my visitors hope you will like these wallpapers and share them with your friends.


Windows 8 wallpapers


My Google+ Profile


Sunday, June 3, 2012

How to see computer model, ram, processor and its other hardware names and models

Whenever you are going to purchase a new system you will be happy to know if you know the professional  way of cheeking computer hardware and its models. You can do it by yourself very simply.

  1. Go to the start menu
  2. in search box type dxdiag
  3. press enter key
  4. after few second new dialog box will opened and show u the all information you about the computer 

hope you like and get it.


My Google+ Profile


Saturday, June 2, 2012

How to use Control Panel in windows 7?


How to use Control Panel in windows 7?
Part 1

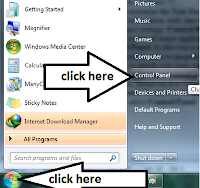
Our last tutorial on how to customize the Task Bar of windows 7 has been published last day which consist on basic information, tool, options and their properties. Now we will move next toward the advance settings. Control Panel is most important and compulsory part of windows operating system all major applications and other system tools can be controlled by using Control Panel. In this way a computer user must understand the Control Panel and its features in order to properly control the windows operating system. Anything you want to attach with your computer or laptop you have to use Control Panel for example, a printer, a scanner, and any USB device or even you want to use On Screen Key Board, Mouse on Key board and many other options like this can be controlled in Control Panel. To open the Control Panel simply Click on Windows Logo start Menu and than select Control Panel.
control panel of windows 7

When you select the Control Panel button from start menu you will see the new dialog box on screen. Which consist on list of programs can be controlled using Control Panel. It will be just like this picture.
windows 7 control panel


You will see on the top of screen heading Adjust Your Computer’s Settings and another button of sub menu View by Category under these two titles all applications are visible by category related items will be shown in one group icon. Following are the titles of all these categories showing when your Control Panel is on View by: Category mode.
Here is list and details of these categories and how to apply the changes by using control panel

  1. System and Security
Start Menu => Control Panel => System and Security
    • Review your Computer’s Status
    • Back up Your Computer
    • Find and Fix problems
                                 
The main Heading is System and Security which is very important tool to keep your system speed fast, to avoid from Virus attacks and to clean up your disk space when you see disk space low error on C drive from here you can clean your disk space.

More specifically Actions Center button for review of your system and resolve problems automatically by using windows Troubleshoot. In this way your computer will automatically solve the security related issues and will inform you about. 

Windows Firewall allow you to cheek your firewall status if you want to block some sites you can add their URL here or if you wan to allow specific website to be opened in this computer you can also add URLs or these websites here.

System here you can see the RAM and Processor related information whenever you are buying new system must cheek this option to know what is real processor and RAM installed in this computer. You can also see processor speed in this option. Remote Access is also located in this option here you can connect your computer with other person using network or internet cable. You can see the name of computer and can change the name of computer and in last Device Manager the most common and informative tools to read about the hardware of your computer. If your want to know which driver is installed or which driver is not installed on your computer just Right click on computer => Properties => Device Manager (short path of this option). Here is complete list of all hardware installed on this computer with their respective brand names and models. When  you purchase new computer or installed new window you have to use this tools to install drivers easily on you r computer. Simply Right click on Icon of hard disk => select update driver => click on update automatically in this way your system drives will be automatically updated it will search for drivers first of all on your computer and if it did not find any driver it will automatically search the latest driver from the internet and install it. In Device Manager when you see Yellow color question mark that means this hardware missing drive so right click on it and select update drive and repeat the above process your driver will be installed automatically. 

Windows Update this is very crucial tools for all of us if we are not using original windows on our system (if you want to activate your windows 7 ultimate permanently click here ). I recommend to turn off windows update if you are not using original windows other wise windows online center will detect your copy as non-original and start sending message to your to activate your original windows your after each restart your desktop screen went black so try to avoid form this tension and keep automatic updates off.

Power Option here you can control power balance and battery settings for laptop or notebook, you can also control the action and behavior of  power button when you press power button what it should do that like it should sleep, restart and log off etc... Change when the computer sleeps here you can set time after how many minutes you screen will be turn off on sleep mode.

Backup and Restore is used to create a restore point for your system normally we use this tools before installing new windows on it after the installation process we will again restore all these setting our computer will restore all our old bookmarks, favorite and documents as it is before installing new windows this utility can be also used when you are going to change your system by using data traveler device you can transfer all setting from one computer to other.

Administrative Tools is used to free up your disk space, to Defragment your hard drive ( when you feel your computer is running slow use this tool it will refresh your hard disk and restore all files and folder in sequence and free the disk space from errors. This tool is also used to create a partitions of your hard disk (read our tutorial on how to create a partition on window 7) 
This is end of first menu in Control Panel part 1


My Google+ Profile


Get free software enter your Email

Get quality contents in your inbox free softwares,games, videos and much more :

Delivered by FeedBurner

My Google+ Profile | Link2soft Facebook